ToDo
In this tutorial we will show you, step-by-step, how to create a To-Do app in Python using Flet framework and then publish it as a desktop, mobile or web app. The app is a single-file console program of just 163 lines (formatted!) of Python code, yet it is a multi-platform application with rich, responsive UI:

You can see the live demo here.
We chose a To-Do app for the tutorial, because it covers all of the basic concepts you would need to create a Flet app: building a page layout, adding controls, handling events, displaying and editing lists, making reusable UI components, and publishing options.
The tutorial consists of the following steps:
- Getting started with Flet
- Adding page controls and handling events
- View, edit and delete list items
- Filtering list items
- Final touches
- Publishing the app
Getting started with Flet#
To create a multi-platform app in Python with Flet, you don't need to know HTML, CSS or JavaScript, but you do need a basic knowledge of Python and object-oriented programming.
Before you can create your first Flet app, you need to
setup your development environment, which requires Python 3.10 or above and flet package.
Once you have Flet installed, let's create a simple hello-world app.
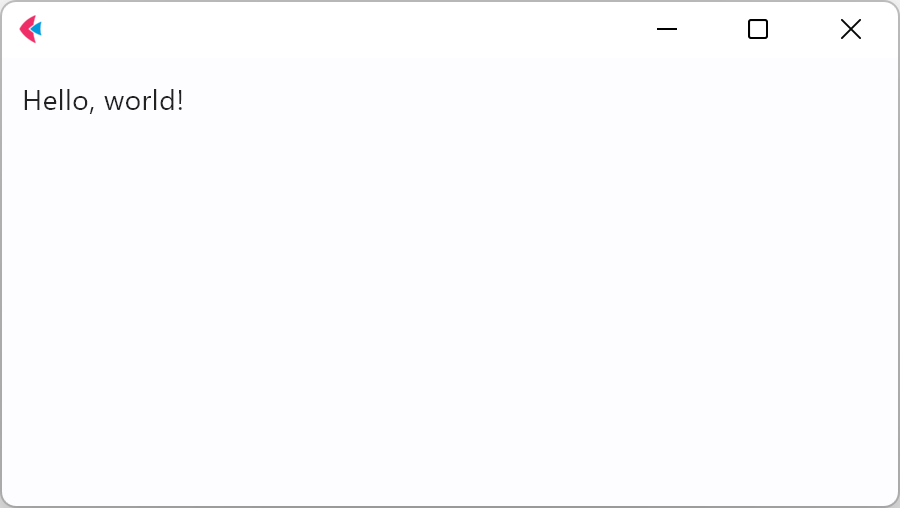
Create hello.py with the following contents:
import flet as ft


def main(page: ft.Page):
    page.add(ft.Text(value="Hello, world!"))


ft.run(main)
Run this app and you will see a new window with a greeting:
Adding page controls and handling events#
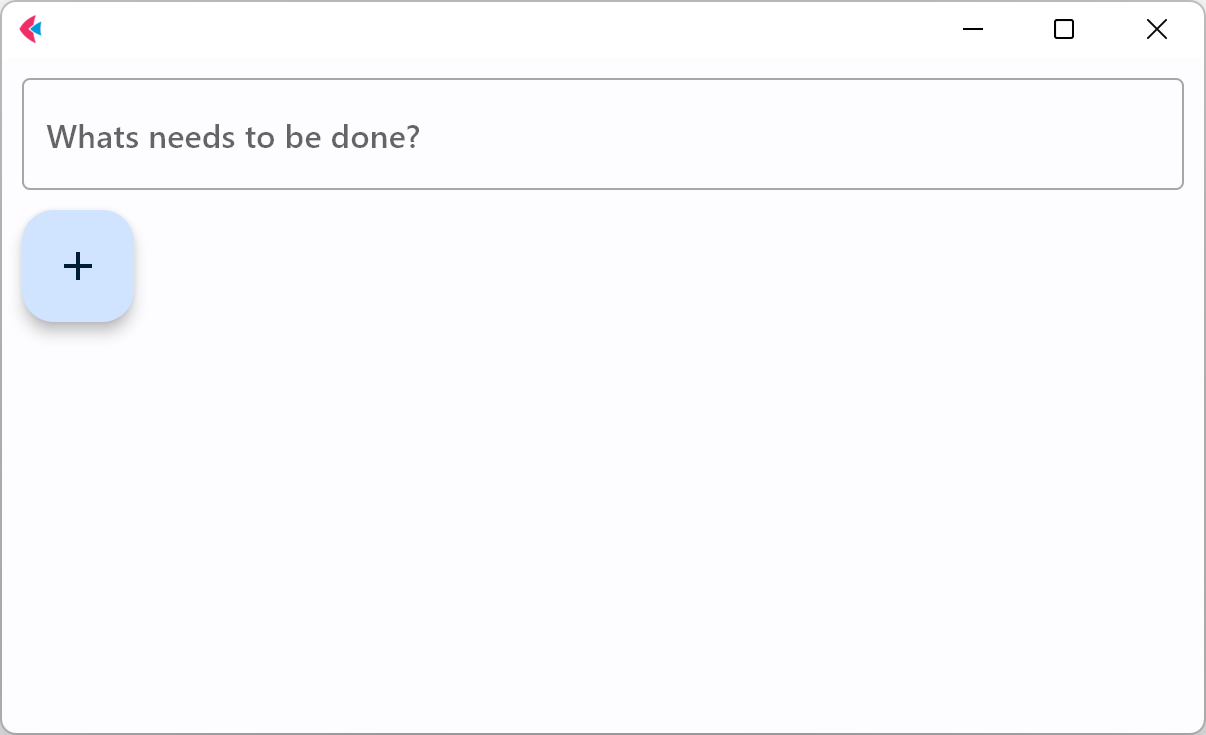
To start, we'll need a TextField for entering a task name, and "+"
FloatingActionButton with an event handler that will display a Checkbox with a new task.
Create todo.py with the following contents:
import flet
from flet import Checkbox, FloatingActionButton, Icons, Page, TextField


def main(page: Page):
    def add_clicked(e):
        page.add(Checkbox(label=new_task.value))
        new_task.value = ""
        page.update()

    new_task = TextField(hint_text="Whats needs to be done?")

    page.add(new_task, FloatingActionButton(icon=Icons.ADD, on_click=add_clicked))


flet.run(main)
Run the app and you should see a page like this:
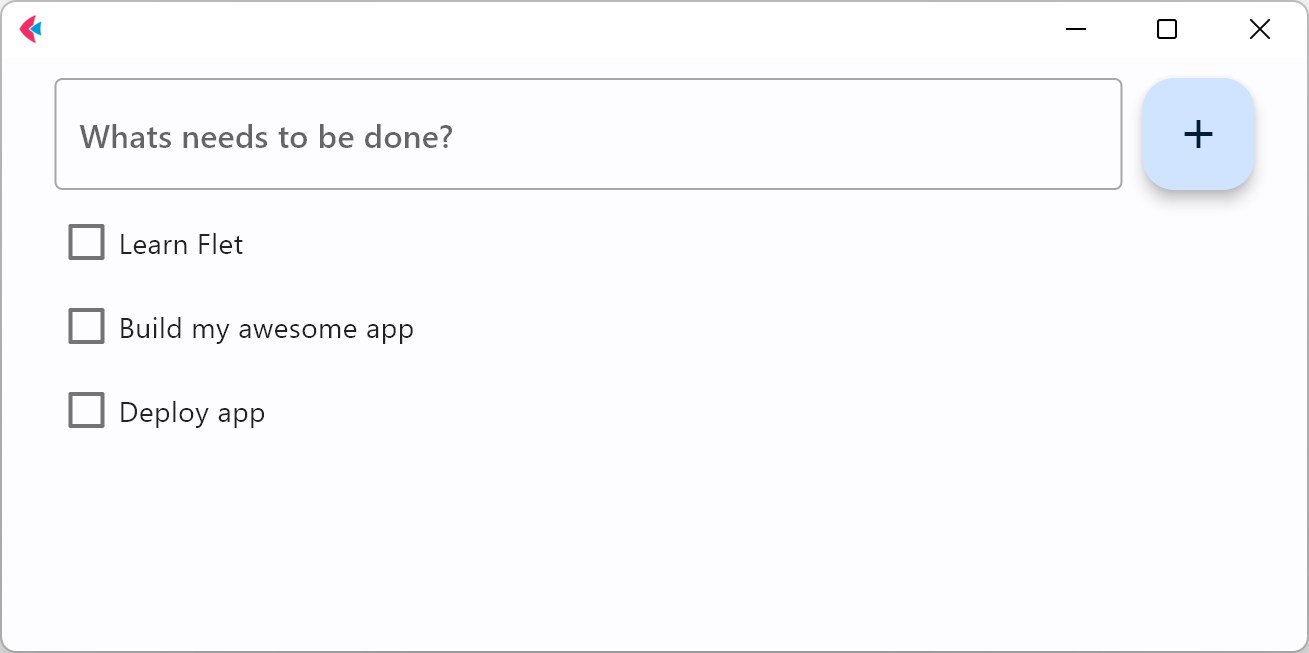
Page layout#
Now let's make the app look nice! We want the entire app to be at the top center of the page, taking up 600 px width. The TextField and the "+" button should be aligned horizontally, and take up full app width:

Row is a control that is used to lay its children controls out horizontally on a page.
Column is a control that is used to lay its children controls out vertically on a page.
Replace todo.py contents with the following:
import flet as ft


def main(page: ft.Page):
    def add_clicked(e):
        tasks_view.controls.append(ft.Checkbox(label=new_task.value))
        new_task.value = ""
        view.update()

    new_task = ft.TextField(hint_text="What needs to be done?", expand=True)
    tasks_view = ft.Column()
    view = ft.Column(
        width=600,
        controls=[
            ft.Row(
                controls=[
                    new_task,
                    ft.FloatingActionButton(icon=ft.Icons.ADD, on_click=add_clicked),
                ],
            ),
            tasks_view,
        ],
    )

    page.horizontal_alignment = ft.CrossAxisAlignment.CENTER
    page.add(view)


ft.run(main)
Run the app and you should see a page like this:
Reusable UI components#
While we could continue writing our app in the main function, the best practice would be to create a reusable UI component. Imagine you are working on an app header, a side menu, or UI that will be a part of a larger project. Even if you can't think of such uses right now, we still recommend creating all your Flet apps with composability and reusability in mind.
To make a reusable To-Do app component, we are going to encapsulate its state and presentation logic in a separate class:
import flet as ft
@ft.control
class TodoApp(ft.Column):
# application's root control is a Column containing all other controls
def init(self):
self.new_task = ft.TextField(hint_text="What needs to be done?", expand=True)
self.tasks_view = ft.Column()
self.width = 600
self.controls = [
ft.Row(
controls=[
self.new_task,
ft.FloatingActionButton(
icon=ft.Icons.ADD, on_click=self.add_clicked
),
],
),
self.tasks_view,
]
def add_clicked(self, e):
self.tasks_view.controls.append(ft.Checkbox(label=self.new_task.value))
self.new_task.value = ""
self.update()
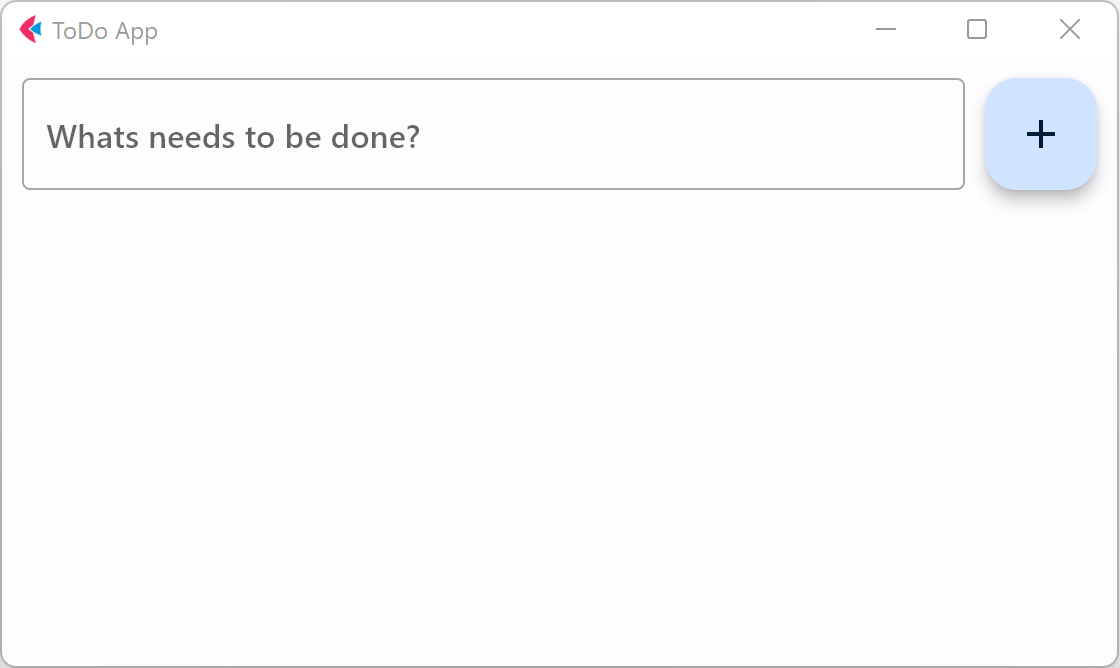
def main(page: ft.Page):
page.title = "To-Do App"
page.horizontal_alignment = ft.CrossAxisAlignment.CENTER
page.update()
# create application instance
todo = TodoApp()
# add application's root control to the page
page.add(todo)
ft.run(main)
Try this out!
Try adding two TodoApp components to the page:
View, edit and delete list items#
In the previous step, we created a basic To-Do app with task items shown as checkboxes. Let's improve the app by adding "Edit" and "Delete" buttons next to a task name. The "Edit" button will switch a task item to edit mode.

Each task item is represented by two rows: display_view row with Checkbox, "Edit" and "Delete" buttons and edit_view row with TextField and "Save" button. view column serves as a container for both display_view and edit_view rows.
To encapsulate task item views and actions, we introduced a new Task class.
Additionally, we changed TodoApp class to create and hold Task instances when the "Add" button is clicked.
For "Delete" task operation, we implemented task_delete() method in TodoApp class which accepts task control instance as a parameter.
Then, we passed a reference to task_delete method into Task constructor and called it on "Delete" button event handler.
from dataclasses import field
from typing import Callable

import flet as ft


@ft.control
class Task(ft.Column):
    task_name: str = ""
    on_task_delete: Callable[["Task"], None] = field(default=lambda task: None)

    def init(self):
        self.display_task = ft.Checkbox(value=False, label=self.task_name)
        self.edit_name = ft.TextField(expand=1)

        self.display_view = ft.Row(
            alignment=ft.MainAxisAlignment.SPACE_BETWEEN,
            vertical_alignment=ft.CrossAxisAlignment.CENTER,
            controls=[
                self.display_task,
                ft.Row(
                    spacing=0,
                    controls=[
                        ft.IconButton(
                            icon=ft.Icons.CREATE_OUTLINED,
                            tooltip="Edit To-Do",
                            on_click=self.edit_clicked,
                        ),
                        ft.IconButton(
                            ft.Icons.DELETE_OUTLINE,
                            tooltip="Delete To-Do",
                            on_click=self.delete_clicked,
                        ),
                    ],
                ),
            ],
        )

        self.edit_view = ft.Row(
            visible=False,
            alignment=ft.MainAxisAlignment.SPACE_BETWEEN,
            vertical_alignment=ft.CrossAxisAlignment.CENTER,
            controls=[
                self.edit_name,
                ft.IconButton(
                    icon=ft.Icons.DONE_OUTLINE_OUTLINED,
                    icon_color=ft.Colors.GREEN,
                    tooltip="Update To-Do",
                    on_click=self.save_clicked,
                ),
            ],
        )
        self.controls = [self.display_view, self.edit_view]

    def edit_clicked(self, e):
        self.edit_name.value = self.display_task.label
        self.display_view.visible = False
        self.edit_view.visible = True
        self.update()

    def save_clicked(self, e):
        self.display_task.label = self.edit_name.value
        self.display_view.visible = True
        self.edit_view.visible = False
        self.update()

    def delete_clicked(self, e):
        self.on_task_delete(self)


@ft.control
class TodoApp(ft.Column):
    # application's root control is a Column containing all other controls
    def init(self):
        self.new_task = ft.TextField(hint_text="What needs to be done?", expand=True)
        self.tasks = ft.Column()
        self.width = 600
        self.controls = [
            ft.Row(
                controls=[
                    self.new_task,
                    ft.FloatingActionButton(
                        icon=ft.Icons.ADD, on_click=self.add_clicked
                    ),
                ],
            ),
            self.tasks,
        ]

    def add_clicked(self, e):
        task = Task(task_name=self.new_task.value, on_task_delete=self.task_delete)
        self.tasks.controls.append(task)
        self.new_task.value = ""
        self.update()

    def task_delete(self, task):
        self.tasks.controls.remove(task)
        self.update()


def main(page: ft.Page):
    page.title = "To-Do App"
    page.horizontal_alignment = ft.CrossAxisAlignment.CENTER
    page.update()

    # create application instance
    app = TodoApp()

    # add application's root control to the page
    page.add(app)


ft.run(main)
Run the app and try to edit and delete tasks:
Filtering list items#
We already have a functional To-Do app where we can create, edit, and delete tasks. To be even more productive, we want to be able to filter tasks by their status.
Copy the entire code for this step from here. Below we will explain the changes we've done to implement filtering.
Tabs control is used to display filter:
# ...

class TodoApp(ft.Column):
    # application's root control is a Column containing all other controls
    def init(self):
        self.new_task = ft.TextField(hint_text="Whats needs to be done?", expand=True)
        self.tasks = ft.Column()

        self.filter = ft.TabBar(
            scrollable=False,
            tabs=[
                ft.Tab(label="all"),
                ft.Tab(label="active"),
                ft.Tab(label="completed"),
            ],
        )

        self.filter_tabs = ft.Tabs(
            length=3,
            selected_index=0,
            on_change=lambda e: self.update(),
            content=self.filter,
        )

    # ...
To display different lists of tasks depending on their statuses, we could maintain three lists with "All", "Active" and "Completed" tasks. We, however, chose an easier approach where we maintain the same list and only change a task's visibility depending on its status.
In TodoApp class we overrided before_update() method alled every time when the control is being updated. It iterates through all the tasks and updates their visible property depending on the status of the task:
class TodoApp(ft.Column):

    # ...

    def before_update(self):
        status = self.filter.tabs[self.filter.selected_index].text
        for task in self.tasks.controls:
            task.visible = (
                status == "all"
                or (status == "active" and task.completed == False)
                or (status == "completed" and task.completed)
            )
Filtering should occur when we click on a tab or change a task status. TodoApp.before_update() method is called when Tabs selected value is changed or Task item checkbox is clicked:
class TodoApp(ft.Column):

    # ...

    def tabs_changed(self, e):
        self.update()

    def task_status_change(self, e):
        self.update()


    def add_clicked(self, e):
        task = Task(
            task_name=self.new_task.value,
            on_status_change=self.task_status_change,
            on_delete=self.task_delete,
        )
        self.tasks.controls.append(task)
        self.new_task.value = ""
        self.update()
    # ...

class Task(ft.Column):
    task_name: str = ""
    on_status_change: Callable[[], None] = field(default=lambda: None)
    on_delete: Callable[["Task"], None] = field(default=lambda task: None)

    # ...

    def status_changed(self, e):
        self.completed = self.display_task.value
        self.task_status_change()
Run the app and try filtering tasks by clicking on the tabs:
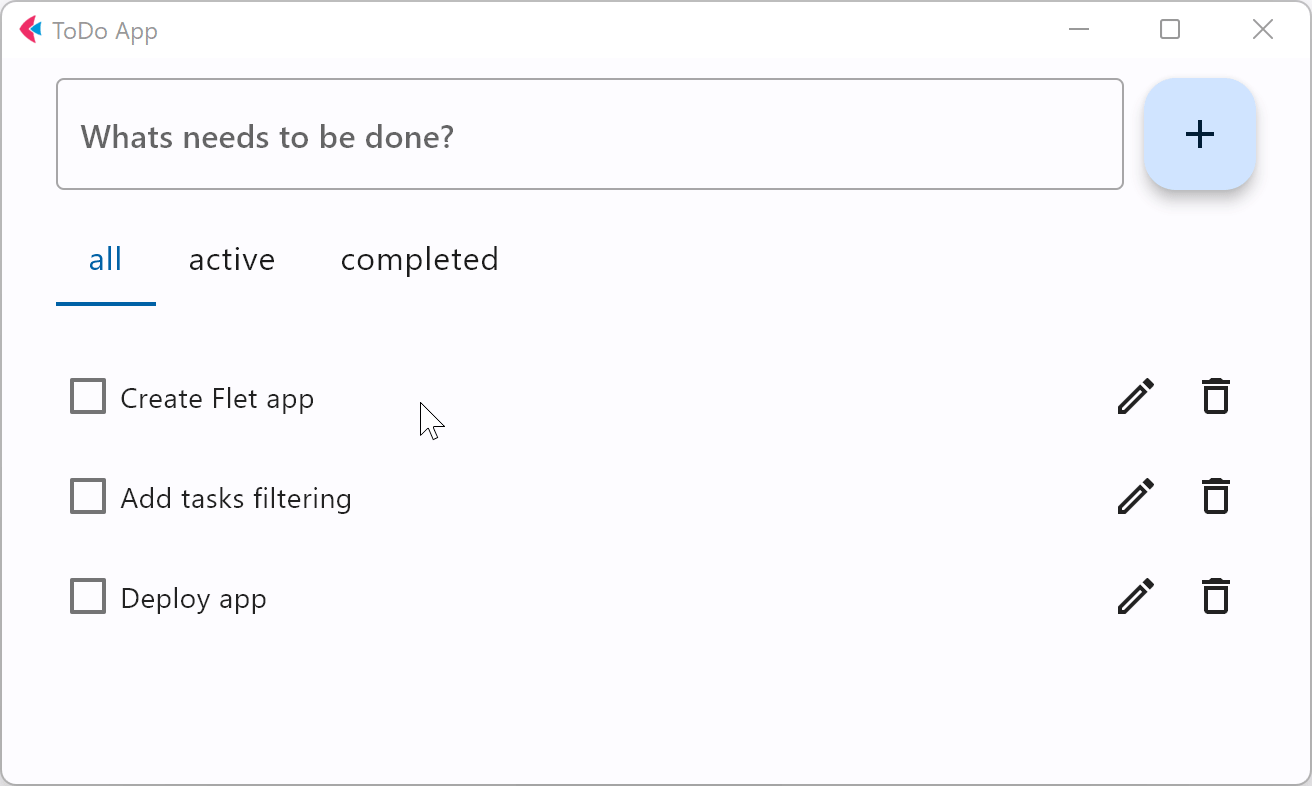
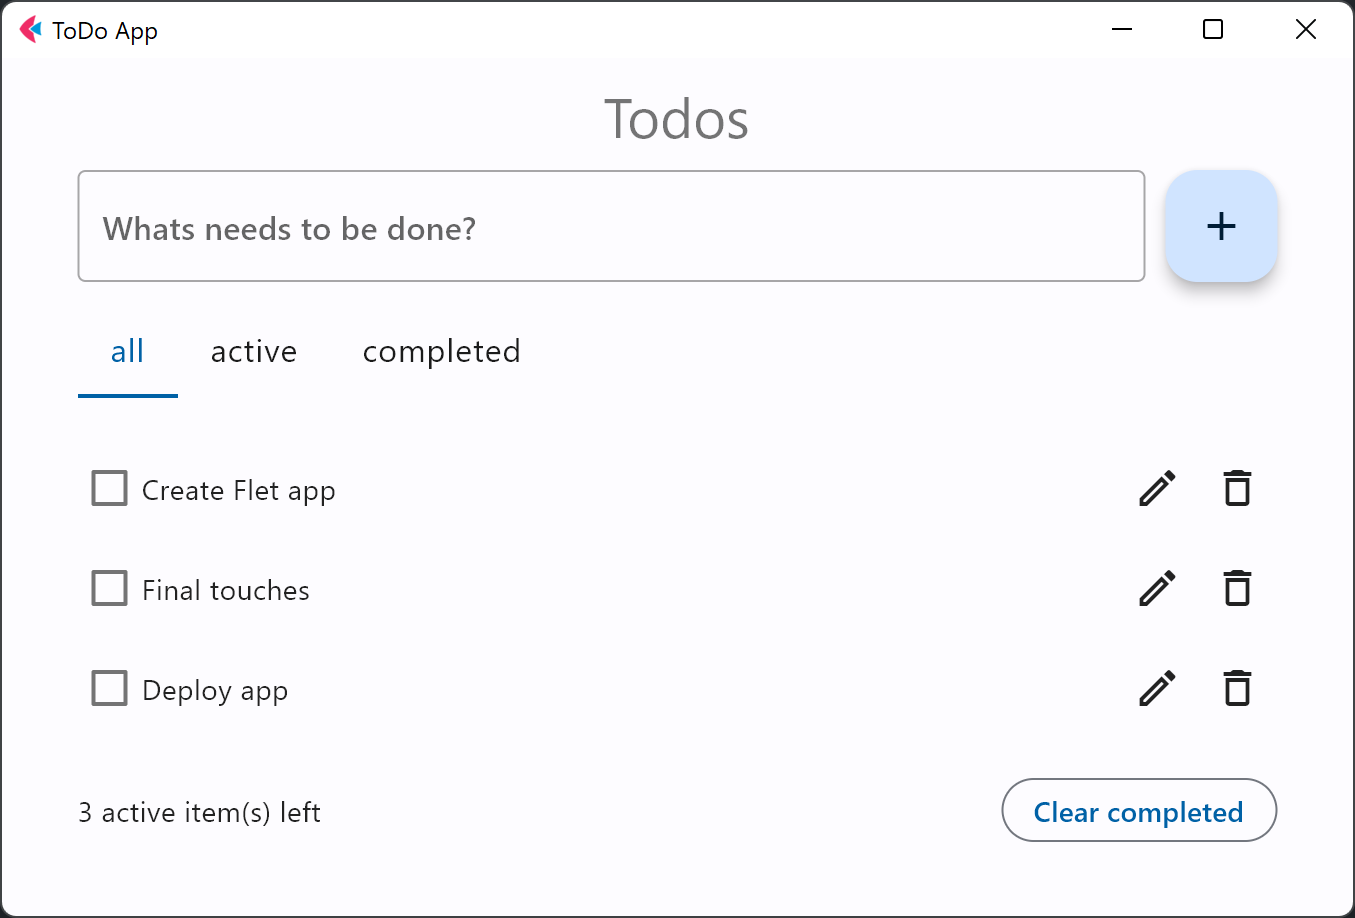
Our Todo app is almost complete now. As a final touch, we will add a footer (Column control) displaying the number of incomplete tasks (Text control) and a "Clear completed" button.
Full code
from dataclasses import field
from typing import Callable

import flet as ft


@ft.control
class Task(ft.Column):
    task_name: str = ""
    on_status_change: Callable[[], None] = field(default=lambda: None)
    on_delete: Callable[["Task"], None] = field(default=lambda task: None)

    def init(self):
        self.completed = False
        self.display_task = ft.Checkbox(
            value=False, label=self.task_name, on_change=self.status_changed
        )
        self.edit_name = ft.TextField(expand=1)

        self.display_view = ft.Row(
            alignment=ft.MainAxisAlignment.SPACE_BETWEEN,
            vertical_alignment=ft.CrossAxisAlignment.CENTER,
            controls=[
                self.display_task,
                ft.Row(
                    spacing=0,
                    controls=[
                        ft.IconButton(
                            icon=ft.Icons.CREATE_OUTLINED,
                            tooltip="Edit To-Do",
                            on_click=self.edit_clicked,
                        ),
                        ft.IconButton(
                            ft.Icons.DELETE_OUTLINE,
                            tooltip="Delete To-Do",
                            on_click=self.delete_clicked,
                        ),
                    ],
                ),
            ],
        )

        self.edit_view = ft.Row(
            visible=False,
            alignment=ft.MainAxisAlignment.SPACE_BETWEEN,
            vertical_alignment=ft.CrossAxisAlignment.CENTER,
            controls=[
                self.edit_name,
                ft.IconButton(
                    icon=ft.Icons.DONE_OUTLINE_OUTLINED,
                    icon_color=ft.Colors.GREEN,
                    tooltip="Update To-Do",
                    on_click=self.save_clicked,
                ),
            ],
        )
        self.controls = [self.display_view, self.edit_view]

    def edit_clicked(self, e):
        self.edit_name.value = self.display_task.label
        self.display_view.visible = False
        self.edit_view.visible = True
        self.update()

    def save_clicked(self, e):
        self.display_task.label = self.edit_name.value
        self.display_view.visible = True
        self.edit_view.visible = False
        self.update()

    def status_changed(self, e):
        self.completed = self.display_task.value
        self.on_status_change()

    def delete_clicked(self, e):
        self.on_delete(self)


@ft.control
class TodoApp(ft.Column):
    # application's root control is a Column containing all other controls
    def init(self):
        self.new_task = ft.TextField(hint_text="Whats needs to be done?", expand=True)
        self.tasks = ft.Column()

        self.filter = ft.TabBar(
            scrollable=False,
            tabs=[
                ft.Tab(label="all"),
                ft.Tab(label="active"),
                ft.Tab(label="completed"),
            ],
        )

        self.filter_tabs = ft.Tabs(
            length=3,
            selected_index=0,
            on_change=lambda e: self.update(),
            content=self.filter,
        )

        self.width = 600
        self.controls = [
            ft.Row(
                controls=[
                    self.new_task,
                    ft.FloatingActionButton(
                        icon=ft.Icons.ADD, on_click=self.add_clicked
                    ),
                ],
            ),
            ft.Column(
                spacing=25,
                controls=[
                    self.filter_tabs,
                    self.tasks,
                ],
            ),
        ]

    def add_clicked(self, e):
        task = Task(
            task_name=self.new_task.value,
            on_status_change=self.task_status_change,
            on_delete=self.task_delete,
        )
        self.tasks.controls.append(task)
        self.new_task.value = ""
        self.update()

    def task_status_change(self):
        self.update()

    def task_delete(self, task):
        self.tasks.controls.remove(task)
        self.update()

    def before_update(self):
        status = self.filter.tabs[self.filter_tabs.selected_index].label
        for task in self.tasks.controls:
            task.visible = (
                status == "all"
                or (status == "active" and not task.completed)
                or (status == "completed" and task.completed)
            )

    def tabs_changed(self, e):
        self.update()


def main(page: ft.Page):
    page.title = "To-Do App"
    page.horizontal_alignment = ft.CrossAxisAlignment.CENTER
    page.update()

    # create application instance
    app = TodoApp()

    # add application's root control to the page
    page.add(app)


ft.run(main)
Publishing the app#
Congratulations! You have created your first Python app with Flet, and it looks awesome!
Now it's time to share your app with the world!
Follow these instructions to publish your Flet app as a mobile, desktop or web app.
Summary#
In this tutorial, you have learnt how to:
- Create a simple Flet app;
- Work with Reusable UI components;
- Design UI layout using
ColumnandRowcontrols; - Work with lists: view, edit and delete items, filtering;
- Publish your Flet app to multiple platforms;