Calculator
In this tutorial you will learn, step-by-step, how to create a Calculator app in Python using Flet framework and publish it as a desktop, mobile or web app. The app is a simple console program, yet it is a multi-platform application with similar to iPhone calculator app UI:
You can find a live demo here.
In this tutorial, we will cover all of the basic concepts for creating a Flet app: building a page layout, adding controls, making reusable UI components, handling events, and publishing options.
Getting started with Flet#
To create a multi-platform app in Python with Flet, you don't need to know HTML, CSS or JavaScript, but you do need a basic knowledge of Python and object-oriented programming.
Before you can create your first Flet app, you need to
setup your development environment, which requires Python 3.10 or
above and flet package.
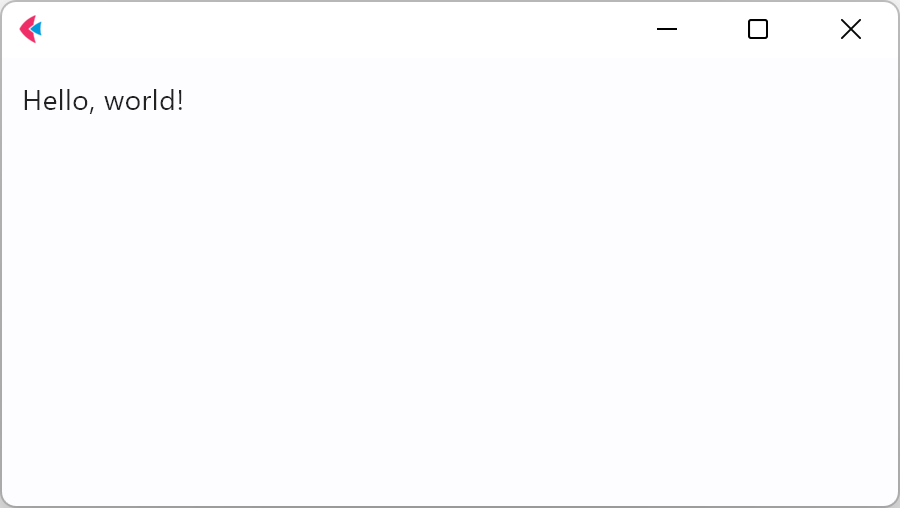
Once you have Flet installed, let's create a simple hello-world app.
Create hello.py with the following contents:
import flet as ft

def main(page: ft.Page):
    page.add(ft.Text(value="Hello, world!"))

ft.run(main)
Run this app and you will see a new window with a greeting:
Adding page controls#
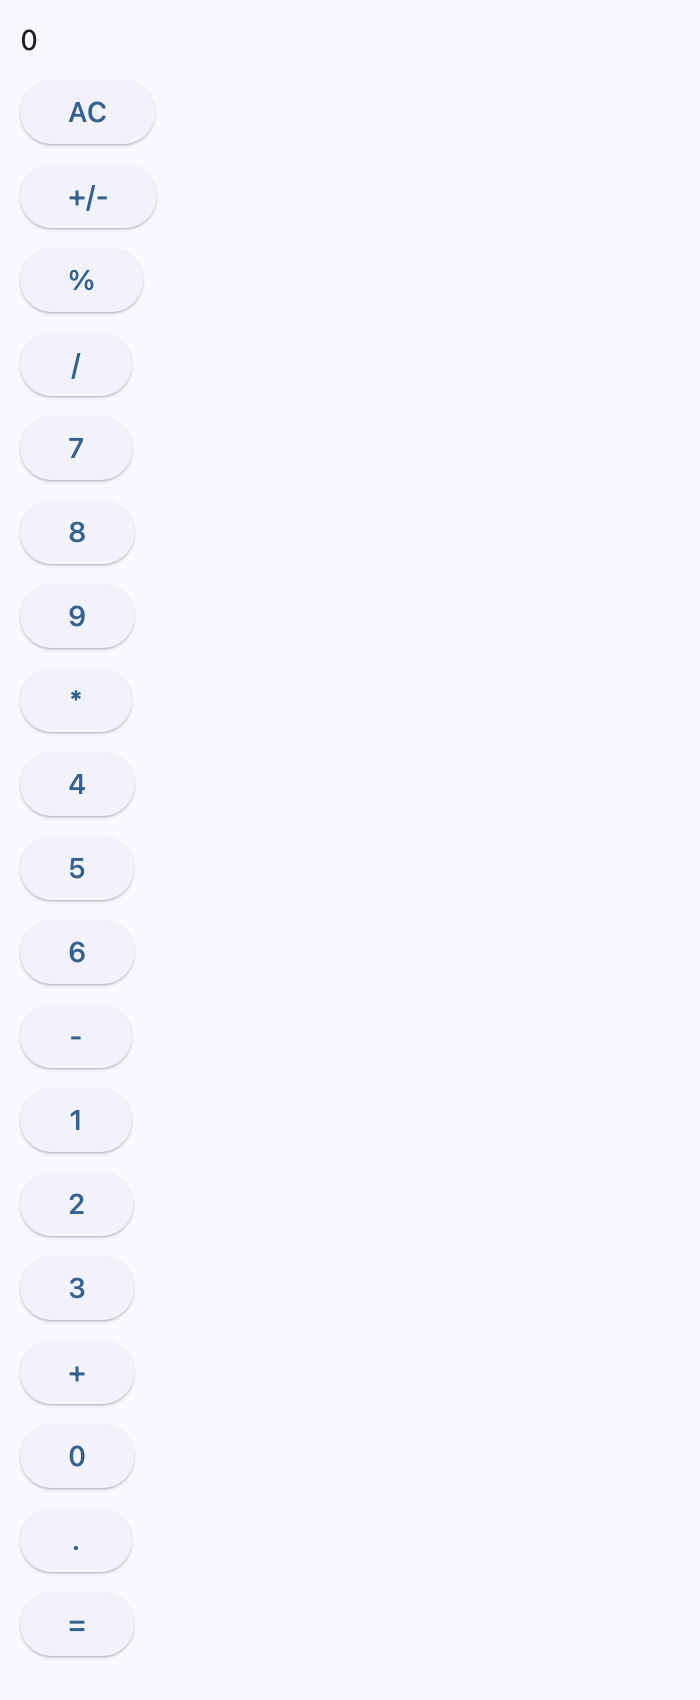
Now you are ready to create a calculator app.
To start, you'll need a Text control for showing the result of calculation,
and a few Buttons with all the numbers and actions on them.
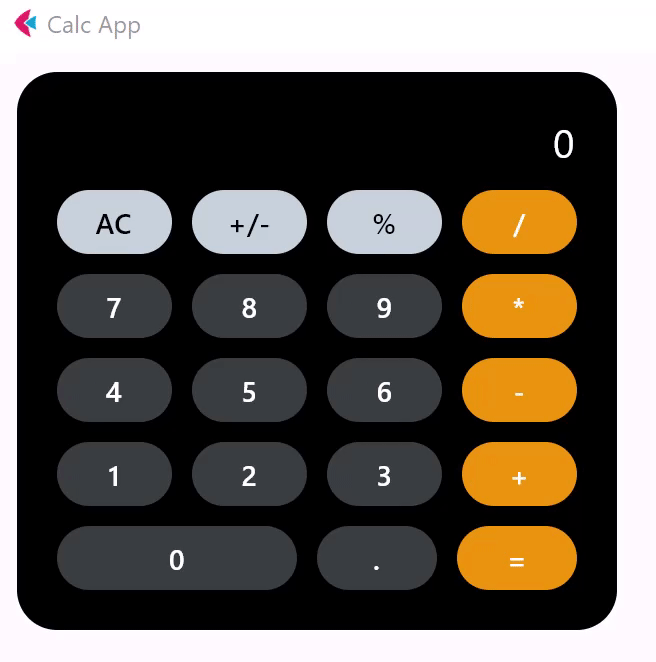
Create calc.py with the following contents:
import flet as ft


def main(page: ft.Page):
    page.title = "Calc App"
    result = ft.Text(value="0")

    page.add(
        result,
        ft.Button("AC"),
        ft.Button("+/-"),
        ft.Button("%"),
        ft.Button("/"),
        ft.Button("7"),
        ft.Button("8"),
        ft.Button("9"),
        ft.Button("*"),
        ft.Button("4"),
        ft.Button("5"),
        ft.Button("6"),
        ft.Button("-"),
        ft.Button("1"),
        ft.Button("2"),
        ft.Button("3"),
        ft.Button("+"),
        ft.Button("0"),
        ft.Button("."),
        ft.Button("="),
    )


if __name__ == "__main__":
    ft.run(main)
Run the app and you should see a page like this:
Building page layout#
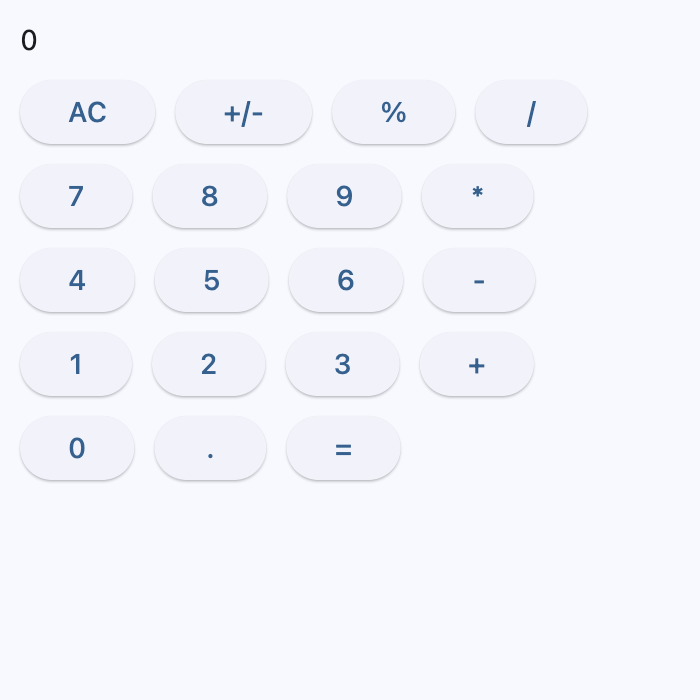
Now let's arrange the text and buttons in 6 horizontal Rows.
Replace calc.py contents with the following:
import flet as ft


def main(page: ft.Page):
    page.title = "Calc App"
    result = ft.Text(value="0")

    page.add(
        ft.Row(controls=[result]),
        ft.Row(
            controls=[
                ft.Button("AC"),
                ft.Button("+/-"),
                ft.Button("%"),
                ft.Button("/"),
            ]
        ),
        ft.Row(
            controls=[
                ft.Button("7"),
                ft.Button("8"),
                ft.Button("9"),
                ft.Button("*"),
            ]
        ),
        ft.Row(
            controls=[
                ft.Button("4"),
                ft.Button("5"),
                ft.Button("6"),
                ft.Button("-"),
            ]
        ),
        ft.Row(
            controls=[
                ft.Button("1"),
                ft.Button("2"),
                ft.Button("3"),
                ft.Button("+"),
            ]
        ),
        ft.Row(
            controls=[
                ft.Button("0"),
                ft.Button("."),
                ft.Button("="),
            ]
        ),
    )


if __name__ == "__main__":
    ft.run(main)
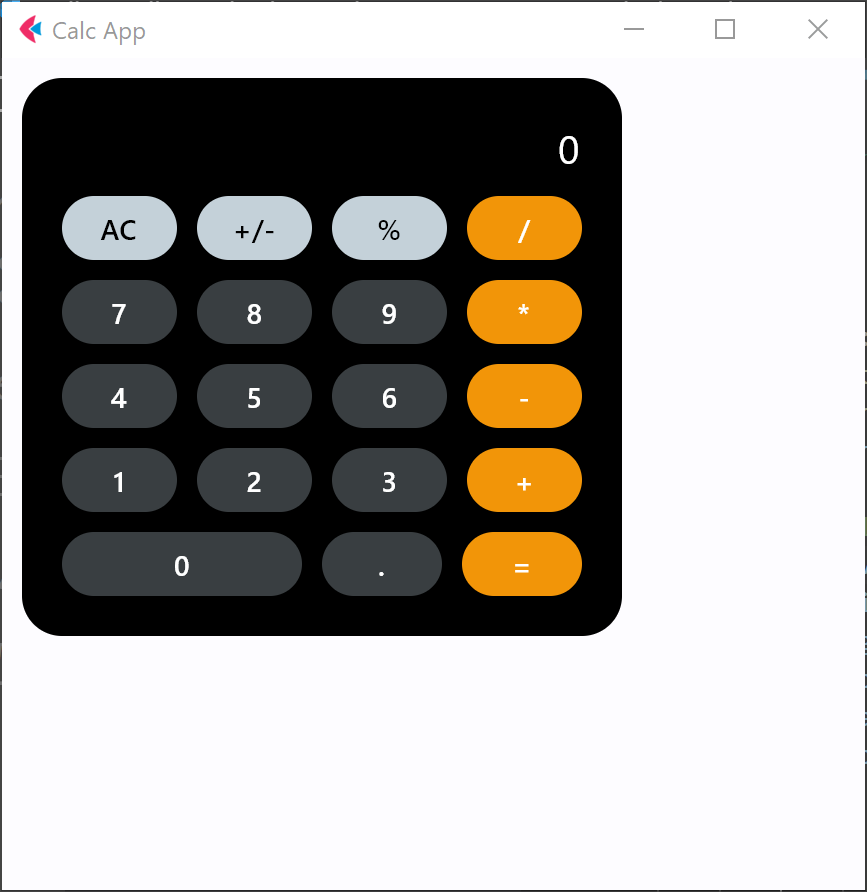
Run the app and you should see a page like this:
Using Container for decoration#
To add a black background with rounded border around the calculator, we will be using Container control.
Container may decorate only one control, so we will need to wrap all the 6 rows into a single vertical
Column that will be used as the container's content:

Here is the code for adding the container to the page:
    page.add(
        ft.Container(
            width=350,
            bgcolor=ft.Colors.BLACK,
            border_radius=ft.BorderRadius.all(20),
            padding=20,
            content=ft.Column(
                controls= [], # (1)!
            )
        )
    )
- This controls list (of the
Column) will contain the six rows of buttons.
Styled Controls#
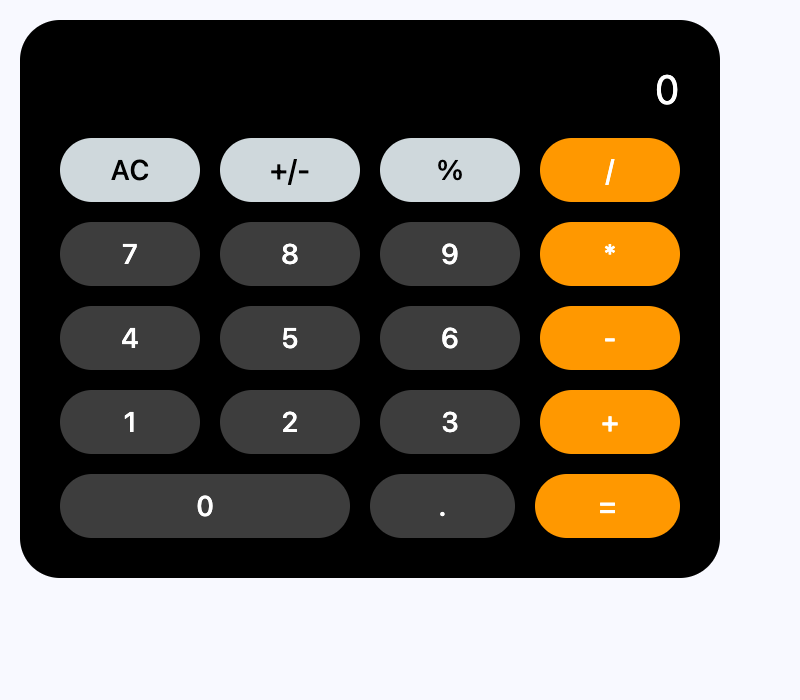
To complete the UI portion of the program, we need to update style for result text and buttons to look similar to iPhone calculator app.
For the result text, let's specify its color and size properties:
For the buttons, if we look again at the UI we are aiming to achieve, there are 3 types of buttons:
-
Digit Buttons. They have dark grey background color and white text, size is the same for all.
-
Action Buttons. They have orange background color and white text, size is the same for all except
0button which is twice as large. -
Extra action buttons. They have light grey background color and dark text, size is the same for all.
The buttons will be used multiple time in the program, so we will be creating custom Styled Controls to reuse the code.
Since all those types should inherit from Button class and have common text and expand properties, let's create a parent CalcButton class:
Now let's create child classes for all three types of buttons:
@ft.control
class DigitButton(CalcButton):
    bgcolor: ft.Colors = ft.Colors.WHITE_24
    color: ft.Colors = ft.Colors.WHITE


@ft.control
class ActionButton(CalcButton):
    bgcolor: ft.Colors = ft.Colors.ORANGE
    color: ft.Colors = ft.Colors.WHITE


@ft.control
class ExtraActionButton(CalcButton):
    bgcolor: ft.Colors = ft.Colors.BLUE_GREY_100
    color: ft.Colors = ft.Colors.BLACK
We will be using these new classes now to create rows of buttons in the Container:
content = ft.Column(
            controls=[
                ft.Row(
                    controls=[result],
                    alignment=ft.MainAxisAlignment.END,
                ),
                ft.Row(
                    controls=[
                        ExtraActionButton(content="AC"),
                        ExtraActionButton(content="+/-"),
                        ExtraActionButton(content="%"),
                        ActionButton(content="/"),
                    ]
                ),
                ft.Row(
                    controls=[
                        DigitButton(content="7"),
                        DigitButton(content="8"),
                        DigitButton(content="9"),
                        ActionButton(content="*"),
                    ]
                ),
                ft.Row(
                    controls=[
                        DigitButton(content="4"),
                        DigitButton(content="5"),
                        DigitButton(content="6"),
                        ActionButton(content="-"),
                    ]
                ),
                ft.Row(
                    controls=[
                        DigitButton(content="1"),
                        DigitButton(content="2"),
                        DigitButton(content="3"),
                        ActionButton(content="+"),
                    ]
                ),
                ft.Row(
                    controls=[
                        DigitButton(content="0", expand=2),
                        DigitButton(content="."),
                        ActionButton(content="="),
                    ]
                ),
            ]
        )
Full code
from dataclasses import field

import flet as ft


def main(page: ft.Page):
    page.title = "Calc App"
    result = ft.Text(value="0", color=ft.Colors.WHITE, size=20)

    @ft.control
    class CalcButton(ft.Button):
        expand: int = field(default_factory=lambda: 1)

    @ft.control
    class DigitButton(CalcButton):
        bgcolor: ft.Colors = ft.Colors.WHITE_24
        color: ft.Colors = ft.Colors.WHITE

    @ft.control
    class ActionButton(CalcButton):
        bgcolor: ft.Colors = ft.Colors.ORANGE
        color: ft.Colors = ft.Colors.WHITE

    @ft.control
    class ExtraActionButton(CalcButton):
        bgcolor: ft.Colors = ft.Colors.BLUE_GREY_100
        color: ft.Colors = ft.Colors.BLACK

    page.add(
        ft.Container(
            width=350,
            bgcolor=ft.Colors.BLACK,
            border_radius=ft.BorderRadius.all(20),
            padding=20,
            content=ft.Column(
                controls=[
                    ft.Row(controls=[result], alignment=ft.MainAxisAlignment.END),
                    ft.Row(
                        controls=[
                            ExtraActionButton(content="AC"),
                            ExtraActionButton(content="+/-"),
                            ExtraActionButton(content="%"),
                            ActionButton(content="/"),
                        ]
                    ),
                    ft.Row(
                        controls=[
                            DigitButton(content="7"),
                            DigitButton(content="8"),
                            DigitButton(content="9"),
                            ActionButton(content="*"),
                        ]
                    ),
                    ft.Row(
                        controls=[
                            DigitButton(content="4"),
                            DigitButton(content="5"),
                            DigitButton(content="6"),
                            ActionButton(content="-"),
                        ]
                    ),
                    ft.Row(
                        controls=[
                            DigitButton(content="1"),
                            DigitButton(content="2"),
                            DigitButton(content="3"),
                            ActionButton(content="+"),
                        ]
                    ),
                    ft.Row(
                        controls=[
                            DigitButton(content="0", expand=2),
                            DigitButton(content="."),
                            ActionButton(content="="),
                        ],
                    ),
                ]
            ),
        )
    )


if __name__ == "__main__":
    ft.run(main)
Just what we wanted!
Reusable UI components#
While you can continue writing your app in the main function, the best practice
would be to create a reusable UI component.
Imagine you are working on an app header, a side menu, or UI that will be a part of a larger project (for example, at Flet we will be using this Calculator app in a bigger "Gallery" app that will show all the examples for Flet framework).
Even if you can't think of such uses right now, we still recommend creating all your Flet apps with composability and reusability in mind.
To make a reusable Calc app component, we are going to encapsulate its state and
presentation logic in a separate CalculatorApp class.
Copy the entire code for this step from here.
Try something
Try adding two CalculatorApp components to the page:
Handling events#
Now let's make the calculator do its job. We will be using the same event handler
for all the buttons and use content property to differentiate between the actions
depending on the button clicked.
We will define button_click method in CalculatorClass and pass it to each button.
Below is on_click event handler that will reset the Text value when "AC" button is clicked:
def button_clicked(self, e):
    data = e.control.content
    print(f"Button clicked with data = {data}")
    if data == "AC":
        self.result.value = "0"
With similar approach, button_click method will handle different calculator actions
depending on content property for each button.
Copy the entire code for this step from
here.
Run the app and see it in the action:
Publishing your app#
Congratulations! You have created your Calculator app with Flet, and it looks awesome! Now it's time to share your app with the world!
Flet Python app and all its dependencies can be packaged into a standalone executable a
package for distribution using flet build command.
Follow these instructions to package your Calculator app into a desktop executable, mobile app bundle or web app.
Summary#
In this tutorial you have learned how to:
- Create a simple Flet app;
- Work with Reusable UI components;
- Design UI layout using
Column,RowandContainercontrols; - Handle events;
- Publish your Flet app to multiple platforms;